Thursday 16 December 2010

My XML Application


News Sieve
NewsSieve is my xml product. It pulls in news feeds using Yahoo and displays them at a certain time that the user specifies. For example if they want football scores they select the day and times they want it and then it will appear on their home page once they sign into the website.

Problems it solves
What NewsSieve does save the user time. Instead of them having to click numerous links and search through lots of articles to find what they want. All they have to do is use NewsSieve to filter out all of the unwanted stuff and display links to what they want. Not only does it do this it also allows the user to select what time they want these links to appear so they do not have too many links at one time thus helping the problem of information overload.

How does it work?
It works by using a yahoo key which is needed to access the API. Once you access the API it does a search using the term the user has entered. The search is then displayed in an XML file and then NewsSieve pulls in tags from this XML document and then displays the top 10 in a handy list for the user on their home page. It does all of this and it uses the times the user enters to display them at the exact time the user asks.

And here is the final link NewsSieve

Wednesday 28 April 2010

Website Rebrand

Well my website has been fully rebranded and finished. It was a long hard task and i'm still not that happy with it but it will do for now until I work on it over the summer.

Take a look: http://www.tomsaundersmpt.co.uk/

Monday 26 April 2010

The Data

And here is the data we collected and used in our sketch.

Click Here

Sunday 25 April 2010

The Processing Sketch

Thanks to Jon our sketch is now online to be viewed. It can be seen here. You may have to wait a while for the first balls to appear. The rate the balls appear is determined by when the bluetooth device was first detected.

So thats it we have transformed Stonehouse by importing activity from other areas and puting it into Stonehouse.

The Visual Element is Complete - Part 2

Continuing on from the last post here is some more code from our Processing Sketch and what it all does.

for (int r= 0; r < count; r++){
if((Fdetect[r] < metricTime)&&(metricTime < Fdetect[r]+3000)){
active[r] = "true";
}else{
active[r] = "false";
}

This checks to see if a particular device had been detected yet.

for(int z = 0; z < count;z++){
if(active[z] == "true"){
//BALL - WALL COLLISIONS
if((posX[z] < rad)||(posX[z] > width -rad)){
speedX[z] = -speedX[z] *loss;
}
if((posY[z] < rad)||(posY[z] > height)){
speedY[z] = -speedY[z] *loss;
}
if(posZ[z] < -10000 +rad){
speedZ[z] = -speedZ[z] *loss;
}
//balls that go beyond the camera are deactivated
if(posZ[z] > 1000){
active[z] = "false";
}

//BALL - BALL COLLISIONS
for(int others = 0; others < count;others++){
if(others != z){
if(ballSize > dist(posX[z],posY[z],posZ[z],posX[others],posY[others],posZ[others])){
TspeedX = speedY[z] *loss;
TspeedY = speedX[z] *loss;
TspeedZ = speedZ[z] *loss;
speedY[z] = speedY[others];
speedX[z] = speedX[others];
speedZ[z] = speedZ[others];
speedY[others] = TspeedY *loss;
speedX[others] = TspeedX *loss;
speedZ[others] = TspeedZ *loss;
}
}
}

//BALL - FLOOR COLLISIONS

speedY[z] = speedY[z] - gravity; //gravity

speedZ[z] = speedZ[z] - 0.2;

posX[z] = posX[z] - speedX[z] *drag;
posY[z] = posY[z] - speedY[z] *drag;
posZ[z] = posZ[z] - speedZ[z] *drag;


pushMatrix();
noStroke();
translate(posX[z],posY[z],posZ[z]);
fill(50,50,200);
sphere(ballSize);
sphereDetail(10);
popMatrix();
}
}


And all of this code controls the bouncing balls. It detects if they bounce of the sides, the ground or eachother and then acts accordingly.

PImage a = loadImage("stonehouse.jpg");
beginShape();
texture(a);
translate(500+width/2.0,650+height/2.0, -100);
fill(255);
scale(300);
vertex(-20, -20, -30, 0, 0);
vertex( 20, -20, -30, 1, 0);
vertex( 20, 20, -30, 1, 1);
vertex(-20, 20, -30, 0, 1);
endShape();
}


And finally this code is just to display the image of the street behind it all. Thats all folks the sketch has been complete.

The Visual Element is Complete - Part 1

Its taken a while but we have finally completed the Processing Sketch that visualises the data we have collected. I won't post up every bit of code that features in our sketch but here are a few of the important bits:

import processing.xml.*;

//DATA GATHERING
XMLElement xml;
XMLElement xmlGrandChild;
float FdetectLow = 9999999;
float LdetectHigh = 0;
int timer;
int LastTime;
int playtime = 600;
float metricTime;

String[] active = new String[1];
String[] address = new String[1];
float[] Fdetect = new float[1];
float[] Ldetect = new float[1];
String[] name = new String[1];
int[] times = new int[1];


This bit essentially parses our XML file and puts it into variables to use later on.

//First Detected
xmlGrandChild = xmlChild.getChild(5);
float temp[] = float(splitTokens(xmlGrandChild.getContent(), " :"));
Fdetect[i] = round(((temp[3]/86400)+(temp[2]/1440)+(temp[1]/24))*pow(10,6));
if(Fdetect[i] < FdetectLow){
FdetectLow = Fdetect[i];
}

//Last Detected
xmlGrandChild = xmlChild.getChild(6);
float temp2[] = float(splitTokens(xmlGrandChild.getContent(), " :"));
Ldetect[i] = round(((temp2[3]/86400)+(temp2[2]/1440)+(temp2[1]/24))*pow(10,6));
if(Ldetect[i] > LdetectHigh){
LdetectHigh = Ldetect[i];
}

}
float duration = LdetectHigh - FdetectLow; //duration in metric time


All of this works out when a device was first detected and when it was last detected so we can then work out how long a device has been active.

//initial positions and speeds
for(int x = 0; x < count;x++){
posX[x] = random((width/2)-250,(width/2)+250);
posY[x] = random(20,200);
posZ[x] = random(-10000,-9800);
speedX[x] = random(-10,10);
speedY[x] = random(-10,10);
speedZ[x] = random(10);
}
}


This code works out where each ball starts off in our sketch and how fast it is going. This was done manually using random numbers rather than using the data we collected otherwise they would all be doing something similar!

Thats all for now I will explain more later.

The Street

Here is a photo of the street that we may use in our Processing Sketch.

Saturday 24 April 2010

The Visual Element And Processing

We have decided on our visual element once again. Now that we are using Processing we've been inspired by something that I did for IDAT102 in Processing. It was a simple 2D bouncing ball idea but the idea now is to use our data to produce bouncing balls in 3D. Jon has been working on something in his spare time using 3D bouncing balls and we will look to implement that into our project by making them bounce down an image of a street in Stonehouse. This fits in with the Transforming Stonehouse theme because our aim is to use some of the activity that occurs in other parts of the city (ie. collecting our data in the Drake Circus Shopping Centre which is in town) and then injecting that into the Stonehouse area because at the moment it is not as lively as it could be.

Tuesday 20 April 2010

The Switch to Processing

Today, we can confirm that Jon and I are switching software from Flash to Processing. We think it will prove easier for the visual side of our project and also I am defintely more confident in using Processing that I am with Flash so it will be easier for both of us to understand and get it to work. Jon will port and translate the current actionscript over to Processing so we can start work on that. We have since decided against the bars idea however and will come up with something new soon.

Collecting The Data


Today Jon and I collected our data. We used a bluetooth adapter and stood in the middle of the mall and waited for people to walk past who had bluetooth devices turned on. When someone walked past the adapter picked up the device's name, the time it was picked up, the type of device it was and gave each one an individual ID. We managed to pick up 400 devices in just an hour and then exported it as an XML file which we can then parse.

Monday 19 April 2010

Processing Sketch - Evaluating

Overall I must say that I am mostly pleased with my sketch. Despite me not having the skill set to write the code for some things I wanted to implement I still managed to get a half decent looking processing sketch.

I am most pleased that I managed to get it to read the XML and then put the data into floats for me to use because this was a part I thought I would struggle with but once I found the correct code this was not that difficult. Another bit I am pleased with is that the balls bounce around all over the stage as originally I struggled to get them to do anything but bounce from the left to the right.

Things I am not too happy about is that I was not able to get the balls to bounce off eachother, it seems that collision detection is more than a bitch in processing than in flash! Also I was a bit upset, but not overly, that I was not able to use XML data to determine how many balls appeared on stage. This was purely because I had no idea what code to write that would achieve this. However I think 8 balls are more than enough for this sketch. Also some may say that its a little bland looking which I can understand as I am not too happy about the white background but there is little I could do really because white truely is the best colour to display things.

So to summarise, I am happy with this because despite enjoying processing I did find some parts difficult and also was not able to get some parts of my idea to work. But overall I am pleased with my sketch and I believe that it is far more interesting to look at than the ArchOS feed!

Sunday 18 April 2010

Processing Sketch - Final Touches

Now that I had the code that would get the data I wanted and the code for the balls I had to do was setup the draw function and create the balls. Unfortunately I could not work out a way to get the balls to bounce off one another and neither could I find out how to use a number to generate objects randomly so I had to create the balls manually as such:

ball1 = new Ball(LT1_Hum);
ball2 = new Ball(LT1_Temp);
ball3 = new Ball(LT2_Hum);
ball4 = new Ball(LT2_Temp);
ball5 = new Ball(LT3_Hum);
ball6 = new Ball(LT3_Temp);
ball7 = new Ball(AtriumA3rd_Temp);
ball8 = new Ball(AtriumA5th_Temp);


And once that was done I entered the float name into the brackets and if you remember from an earlier post the number in the brackets would be the radius.

And here is my draw function that displays the balls:

void draw() {
background(255);
ball1.move();
ball2.move();
ball3.move();
ball4.move();
ball5.move();
ball6.move();
ball7.move();
ball8.move();
ball1.display();
ball2.display();
ball3.display();
ball4.display();
ball5.display();
ball6.display();
ball7.display();
ball8.display();
}


That is it, that is how my processing sketch was made. I will evaluate it properly at some point in the future.

Friday 16 April 2010

Processing Sketch - Getting The Data

Now that my balls were practically finished I thought I would get onto writing the code that would collect the data I was going to use.

First of all I setup the floats that I was going to use:

float outsidetemperature;
float windspeed;
float windvane;
float humidity;
float LT1_Hum;
float LT1_Temp;
float LT2_Hum;
float LT2_Temp;
float LT3_Hum;
float LT3_Temp;
float AtriumA3rd_Temp;
float AtriumA5th_Temp;


I will state later on why I chose these particular bits of data.

Then I wrote these lines of code to get the numbers that I wanted.

outsidetemperature = float(description[21].getContent());
windspeed = float(description[37].getContent());
windvane = float(description[36].getContent());
humidity = float(description[20].getContent());
LT1_Hum = float(description[14].getContent());
LT1_Temp = float(description[15].getContent());
LT2_Hum = float(description[16].getContent());
LT2_Temp = float(description[17].getContent());
LT3_Hum = float(description[18].getContent());
LT3_Temp = float(description[19].getContent());
AtriumA3rd_Temp = float(description[23].getContent());
AtriumA5th_Temp = float(description[24].getContent());


I worked out that the XML feed was sort of like an array and thus by entering a number between the square brackets I could select what data I wanted using getContent. Now these were stored into the variables all I would have to do is type the float name and that number would be used.

Processing Sketch - The Bouncing Balls

Now that I have written the code that will read the XML I thought I would make a start on the balls which will appear in my sketch. I opened up a brand new tab and wrote the code to get the balls to bounce off the walls. I decided to leave the complicated collision detection stuff until later.

class Ball {

float r; //this is the circle's radius
float x,y;
float xspeed,yspeed;
color c;

Ball(float tempR) {
r = tempR;
x = random(width);
y = random(height);
xspeed = random( -5,5);
yspeed = random( -5,5);
}

void move() {
x += xspeed;
y += yspeed;

if (x > width || x < 0) {
xspeed *= - 1;
}

if (y > height || y < 0) {
yspeed *= - 1;

void display() {
stroke(0);
fill(c);
ellipse(x,y,r*2,r*2);
c = color(100,50);//using a basic grey colour for now


This code creates the Ball class and it sets it speed and colour (for now, later I will look to making these data from the XML feed). I have also set up for the ball to bounce of the sides of the stage.

Thursday 15 April 2010

Processing Sketch - The Start

I have chosen to go with the bouncing balls idea and have just started work on it today. First off I have written my code that will read the XML data I will need and the setup.

import processing.xml.*;

XMLElement xml;
XMLElement[] title;
XMLElement[] pubDate;
XMLElement[] description;

void setup()
{
size(500,500);
background(255);
smooth();
frameRate(60);
String url = "http://arch-os.scce.plymouth.ac.uk/bms_data.rss";
XMLElement xml = new XMLElement(this, url);
title = xml.getChildren("channel/item/title");
pubDate = xml.getChildren("channel/item/pubDate");
description = xml.getChildren("channel/item/description");


And thats all for today folks. In the next view posts I will describe the process in making my sketch.

Processing Sketch - First Thoughts

Ah processing I was actually enjoying it during the sessions but now theres an assignment I think may begin to hate it. As always with assignments I go through the initial ideas stage. However it seems that I am stuck for ideas with this one. Currently I've only got these 2 ideas:

Bouncing Balls: I will have balls bouncing off the sides of the stage and off eachother changing colour and/or size based on the XML data. I will also hopefully be able to use some data to determine how many balls appear on the stage at one time.

Falling Objects: There will be objects falling from the top of the stage and falling through the bottom. Again I would use the data to change the colour/size and also determin how many objects appear.

I will post again soon stating which idea I have chosen or if I come up with a better one! (highly unlikely)

Issues with Flash

So we discovered that there are issues with Flash when it comes to using it for what we wanted to use it for. In Jon's Post he mentions issues with combining XML streams. If we continue to struggle we may have to change the software we using and at the moment we are considering using Processing. We will however continue to attempt to get stuff working in Flash before.

Saturday 20 March 2010

The Visual Element

Now that we had the backbone code that will parse the XML we could start on the visual side of things. We had the idea of using blocks to represent how long a device had been active. The wider the box the longer the device had been around the area we were collecting data in. So Jon, once again the brighter half of our team, came up with a function that would do this.

function barGen():void {
for (var z:Number = 1; z < device.length; z++) {

var myBar:mcBar = new mcBar();
this.addChild(myBar).name = "myBar" + z;
myBar.y= (z * 8);
var tempX = translateRange(parseInt(Earliest),parseInt(Latest),0,stage.stageWidth,parseInt(Fdetect[z]));
myBar.x = tempX;
myBar.width = (translateRange(parseInt(Earliest),parseInt(Latest),0,stage.stageWidth,parseInt(Ldetect[z])) - tempX);
myBar.height = 5;
}

//getChildByName("myBar" + z)

}
function translateRange(a1: Number, a2: Number, b1: Number, b2: Number, num:Number):Number {
var c:Number = ((num - a1) * (b2 -b1)/(a2 - a1)) + b1;
return c;
}


What this code does is it creates a variable called myBar which takes a movie clip, in this case called mcBar, and produces a new mcBar each time. Each bar represents a particular bluetooth device. Then using translateRage (the created function you can see that essentially maps the numbers) it edits the width of the bars compared to the numbers that have been stored in the Earliest and Latest variables. Thus making the the bar wider depending on the time this particular device has been active. The height of each bar is manually set so all of the bars are the same.

So using some dummy data we managed to get something looking like this:

Friday 5 March 2010

Our Project: The Beginning

Now that we've decided we are not using Arduino we needed to decide on what we will use for our visual element. We have decided that using flash and actionscript is the way forward. Jon, being the more technical part of the team, has come up with some code that will parse the XML that will be produced by the program we are using:

xmlLoader.addEventListener(Event.COMPLETE, LoadXML);
xmlLoader.load(new URLRequest("data.xml"));

function LoadXML(e:Event):void {
xmlData = new XML(e.target.data);
Parse(xmlData);
}

var address = new Array(); ...

function Parse(Input:XML):void {
var Children:XMLList = Input.item.children();

for each (var Info:XML in Children) {

if (Info.name() == "address") {
address[i] = Info;
}

Fdetect[i] = temp.substring(11,13) + temp.substring(14,16) + temp.substring(17,19);

if (Fdetect[i] <>
style="font-size:78%;">Earliest = Fdetect[i];
}


Apart from parsing the XML this code also picks out data by its tags and puts it into the array you can see. An 'if' statement is used to cycle the array index. The Fdetect part you can see is uses substring to extract the date and time and to put them next to eachother so they are easier to read. The final 'if' statement checks if a date and time is more recent than the currently stored date and time for a particular device. If it is then it replaces the stored value. This allows flash to find the earliest and latest time for all of the data which will prove useful for the visual side of things.

Software Output

As stated in a previous post we have chosen our software that will collect our data. We have no deefinitely chosen our output to be XML that we will then try to parse into flash (more on this coming later). Below is a standard XML output from the software provided to me by Jon:

Thursday 25 February 2010

Our Project and Arduino 2

So after a more thorough search around the web and other research it appears that, despite it being possible, we are no longer inplementing Arduino into our project. As mentioned it is possible but it is extremely complex and is something that is best left for a time when we are more skilled and/or have the time to do so. So this means that we are back to the original plan of collecting data using a laptop and a bluetooth adapter. This also allows us to now focus on the visual side of our product.

Sunday 21 February 2010

The Software We Are Using

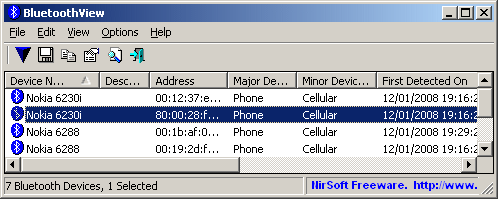
A while ago Jon posted about some software he had found. This is definitely the software we have decided to use. It records the device’s name, when it is first detected, when it was last detected and is able to output the information in a variety of formats, XML probably being the one we will use.


Image from the website


It can be found here: http://www.nirsoft.net/utils/bluetooth_viewer.html

Saturday 20 February 2010

Our Project and Arduino

So after a brief talk with Lee and hunting the internet it appears our discovery of the bluetooth arduino board was not as good news as we first thought. It appears this device allows only communication via bluetooth rather than being able to scan and record bluetooth data on. However we are still hopeful of finding a way to use Arduino that we can use for our project otherwise we may have to abandon using Arduino all together.

Tuesday 16 February 2010

Bluetooth Arduino Board

There is good news. After looking around it appears that there is a bluetooth arduino board which me and Jon can use for our project. The details of it at the moment are unsure as we need to look into it further. But it does look like we will be able to collect bluetooth data on it which would be ideal.

Wednesday 10 February 2010

Arduino

Today we were introduced to Arduino by Lee Nutbeam. Arduino is made by the same people that created Processing (view my work for IDAT102 for more information). It is free software and its interface and language is very similar to Processing. Once you've used the software to write your code you can then use it with the Arduino boards. Arduino boards are devices with which people can create interactive objects or environments. Below is an example of one.


These can be used to make things such as an LED turn off and on which is what we experimented with in the session.

Monday 1 February 2010

Flash Game: The Mentions

As I did with the website assignment this is the post where I do all the mentions and thankings.

First of all thanks to Chris Saunders for teaching me Actionscript and giving me examples of code I used in my final game.

Thanks also to Jon again for helping me out in times of difficulty.

Another small mention to Simon for once again being up at the same time as me and its also his birthday today.

And finally gotta mention itunes for playing music when I needed it most. You'll be surprised how useful Blur's Song 2 coming on through the shuffle can motivate you to work.

Flash Game: The Evaluation

So my game is finished but of course like every project it is always good to evaluate it.

Overall I am very pleased with the final outcome of my flash game as I have never touched actionscript to create a game from scratch before. I am most pleased with the way I have managed to get the car to move like a real car as this was rather difficult and I did have to look at a few examples to help me on my way. I am also pleased with getting my outside element with the time working as this proved to be tricky whilst attempting it also. Finally I am pleased with most of collision detection code such as going off the track as this was a vital part of my game.

However, with most things, there are parts I was not so happy with. As I said just the sentence before I was happy with most of my collision detection. I was less happy with my "mud patches" and "barrels". First of all I wanted my mud to be funny shaped and barrels to be round however using the hitTestObject code this was not possible as they were treated as rectangles anyway so I ended up just making them rectangles. Also sometimes the car is effected by collision detection despite it not being near the object so I am less happy with this. The other thing I was not so happy about, yet not so bothered about, is the shape of my car. It is just a rounded rectangle as my drawing skills are not very good at all. I would have prefered if each end of the car was easy to spot. However I am not all that bothered about it because as soon as the user presses a button they know which end is which.

So things I would improve if I had more time/had to do this type of game again. As mentioned in my research post I would have liked to have a random block spawning feature so thet track changes each time. Although time did not allow this it is something I would like to add in the future if I develop this game further. Also my idea of having the track darker with floodlights did not really happen as I was short of time and skill to get it working properly.
Other improvements include going into deeper detail with collision detection to see if I could get it working perfectly without a hitch. I would have the car bounce off the barrels better than just making the speed = the opposite direction. I would also edit my car so that each end was easily detectable. Another improvement I would make would be to have a better way to stop people cheating by reversing over the line. My current way is OK but not the best as it is probably possible to get a quicker time by turning around. However after much testing this takes a lot of practice so i'm hoping users would just go around the honest way to have a better game experience. Especially as this is the casual gamer playing this game anyway.

To quote David Beckham, at the end of the day, I am very pleased with my flash game. The positives, for me, out-weigh the negatives and improvements. Therefore I see this project as a success and must admit I think I have achieved the aim I set myself. This was to have the game have a sort of addictive quality to it and just playing it by myself I believe I was addicted (before I got the best score anyone can possibly get, I am the creater afterall!) and I think others will feel the same. I can only hope people have as much fun playing it as I did making it, for the most part anyway!

Flash Game: Sounds and that annoying outside element!

So as the title says I will discussing my sounds and how I got them working. I decided that my sounds HAD to be car and driving based and what 2 better sounds could I get than Jessica by the Allman Brothers (or as its better known the Top Gear theme) and The Chain by Fleetwood Mac (or as its better known the formula 1 theme - not sure if its the old or current but oh well).
So after gaining these mp3 files I set about coding getting them to play.

var snd:Sound = new Sound();
snd.load(new URLRequest("TheChainSample.mp3"));
var channel:SoundChannel = new SoundChannel();

channel = snd.play();

function playGame(event:MouseEvent){
gotoAndPlay(3);
channel.stop();
}


The code you can see is from my intro frame. It calls the sound file (snd.load) and then places it into the var channel. I then tell the channel to play but stop once the user clicks the play button. The reason being that I want a new sound to play during the game itself.

var snd2:Sound = new Sound();
snd2.load(new URLRequest("JessicaSample.mp3"));
var channel2:SoundChannel = new SoundChannel();

channel2 = snd2.play();

channel2.stop();


This is the code used on my actual game frame. Once again I call the file (snd2.load) and place it into a var (this time channel2) and I then tell it to play (snd2.play). I had to add the 2's on the end of snd and channel otherwise it would play the sound from the intro screen again. The stop code you saw previously in this post. I tell the sound to stop once the player returns to the splash screen.


Now I will go onto the external element part of the brief that we had to include. I decided to keep it simple and to change the background depending on what hour of the day it was. If it was an odd number the background of my track would be brown however if it was an even number the background would remain green. I did it as so:

var currentDate:Date = new Date();
trace(currentDate.getHours());

I called the current date and used it to get the current hour of the day.

I then created a function and within it typed:
function changeBackground(evt:Event):void
{
if ((currentDate.getHours() == 1)||(currentDate.getHours() == 3)||(currentDate.getHours() == 5)||(currentDate.getHours() == 7)||(currentDate.getHours() == 9)||(currentDate.getHours() == 11)||(currentDate.getHours() == 13)||(currentDate.getHours() == 15)||(currentDate.getHours() == 17)||(currentDate.getHours() == 19)||(currentDate.getHours() == 21)||(currentDate.getHours() == 23)){
mc_newBG.x = 400;
mc_newBG.y = 400;
mc_newinsideBG.x = 76.40
mc_newinsideBG.y = 90.95
}
}

Unfortunately the block quote ruins the lay out. Basically I created two off screen brown objects and moved them inscreen whenever the current hour was 1,3,5,7,9,11,13,15,17,19,21 or 23. The inside of the track was difficult to do. I had to set the registration to the top left corner, grabbed the co-ordinates of my inside track rectangle and then set the brown rectangle to move into the exact same space.

And that my friends is my flash game finished! All thats left for you to do is to go and play it which you can do so HERE. Goodbye for now.

Flash Game: Collision Detection is back :( but intro screens yay!

Yes thats right ugly collision detection is back however because I tamed it before this time it was pretty straight forward! As I mentioned earlier I created obstacles on my course so to get them working it was time to delve into actionscript again.

Here is a sample of the code I used for my barrels:

if (mc_car.hitTestObject(mc_barrel1)){
speed = -2
}


and here is a sample for my "mud patches"

if (mc_car.hitTestObject(mc_mudpatch1)){
speed = speed/1.5
}


As you can see the mud patches work very much the same as the offtrack rectangles by giving the car a significant speed reduction. The barrels work differently. I made the speed - 2 which makes the car go in reverse to give the impression that it has rebounded back off a barral.

I also used some more collision detection to stop people simple reversing over the finishing line and winning. I drew a small line and assigned this code to it:

if (mc_car.hitTestObject(mc_stopcheats)){
speed = 2
}


Basically if they pressed reverse as soon as they hit the line the speed would change to 2 which would send them forwards to once again give that bounce effect. Of course whats to stop them turning around and doing it? Well ive worked out it would actually be quicker for them to complete the lap rather then do that so it all works out well!

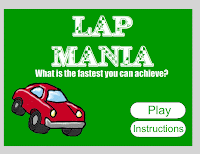
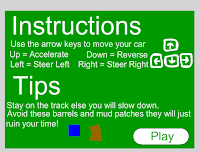
Right! Now that the game was actually finished (bar a major part of the brief which I will go into in a later post) I could add finishing touches such as intro screens.
To create these i simply just added new frames before my main game frame. I decided I wanted an intro screen and a screen that I used for instructions.

Below are screenshots of the 2 screens I created:


On these I used small amounts of actionscript. This was purely so I could get buttons to work the way I wanted. Aswell as a small part of sound that I will go into later. Below are the bits of code I used:

btn_play.addEventListener(MouseEvent.MOUSE_UP,playGame);
btn_instructions.addEventListener(MouseEvent.MOUSE_UP,instructions);

function playGame(event:MouseEvent){
gotoAndPlay(3);
channel.stop();
}
function instructions(event:MouseEvent){
gotoAndPlay(2);
}


The bits above are from my intro screen. They add mouse click events so that my buttons work. The gotoAndPlay bits take the user to the frame that I want them to go to. The instructions screen is very much the same minus the code for the button to take them to the instructions obviously!

Right that is collision detection part 2 and the intro screens explained please tune into the next post for more write up of my flash game!

Flash Game: The Timer and The Finishing Line

So the timer. The thing which my game style circles around because it times how fast people complete the track. Below is the code I used to get it working:

var myTimer:Timer = new Timer(1000);

myTimer.start();
function laptime(event:TimerEvent):void
{
timerTxt.text = String(myTimer.currentCount);
}


I would use other lines of code to stop and reset it at a later date.

Now onto the finish line. The idea for this was that the user would complete the track and then the finishing stages of the game would occur. This means that collision detection needed to come back again so that when the car hit the finishing line all of these finishing stages would occur. I will let the code I used do the talking here and I will explain after:

function finishline(evt:Event):void
{
if (mc_car.hitTestObject(mc_finishline)){
mctheEnd.x = 139;
mctheEnd.y = 138;
mctheEnd.text = "Congratulations your Lap Time was: \n" + myTimer.currentCount + " seconds";
mc_lighten.x = 200;
mc_lighten.y = 200;
mc_lighten.alpha = 0.95;
myTimer.stop();
btn_playagain.x = 273;
btn_playagain.y = 270;
mc_car.visible = false;
channel2.stop();
}
}


So the first thing I wanted was for some text to appear. To do this I created a text box off screen and then once the car hit the point it would be moved on screen. I created a dynamic text box. This would also allow me to state what text would appear which is the next line of my code. I got it to show the current point on my timer along with a congratulations message.
The next part of my code is mc_lighten. This was a white box that I again had off screen and moved on screen. The purpose of this was to lighten (hence the name) the game in the background so that the message would be easier to read. The change the opacity of this white box i used the .alpha code and set it to 0.95 opacity.
The next line is pretty much self explanatory even to those who do not understand actionscript! I basically stop the timer so that it doesn't continue going up and that the final time can be displayed in my message as mentioned above.
I then created a play again button and again moved that on screen from offscreen this is so the user can play the course again to try and beat their score.
Next I decided I would change the car's visibilty to 0 so that the user wouldn't be able to tell that they can move the car once they've finished the track. This was not really needed but I felt the need to do it anyway.
The final bit of code is to stop a sound playing which I will mention in a later post.

And so thats it for the timer and the finishing line. The next post will be all about how I got my obstacles working and the splash screens I created to go with the game.

Flash Game: Collision Detection, what a bastard!

Yes the title states my feelings towards collision detection because it claimed about 20 hours of my life (only a slight exaggeration). I originally had it detecting a sort of wall around my track but I realised after ages that this would not work. So I set about lining my track with reectangles around the outside and using these few lines of code within my collision function over and over:

if (mc_car.hitTestObject(mc_topboundary)){
speed = speed/1.5
}


And here is an image showing my rectangles I used (they're the objects with blue outlines):


And now if my car went over the edge of the track it would be hit with a severe speed penalty and would not be able to travel anywhere any fast. This was mainly to stop cheats driving down the middle of my track.

Next I will describe perhaps the 2nd most important part of my game, the timer!

The beginnings of my flash game

So onto the beginning of my flash game. First of all I had to draw what I was going to need which would be a track and definitely a car. I also drew some obstacles that I would code later on aswell as a dynamic text box to become my timer. All of these were given their own layer. E.g. obstacles, timer, car, track etc.


Now that it was all drawn I could begin coding so I created my Actionscript layer. I decided that first I would code my car, however it wouldn't be easy as I wanted it to move exactly like a car rather then a dot along a road.
This proved to be incredibly tricky needing lots of vars and functions howwever I finally got it to work with gradual acceleration, stearing and reversing. This is my proudest achievement in actionscript to date. Below are all the vars I used for this part of my code:
var speed = 0;
var acceleration = 0.2;
var maxSpeed = 10;
var maxReverse = -5
var carRotation
var leftPressed
var rightPressed
var upPressed
var downPressed
var friction = 0.85
var rotationSpeed = 12


I decided it would be easier to create vars stating that a button is pressed and then creating a function using that var then to just simply have the key code scripting. Below is an example of what I did:

if ( event.keyCode == 37){
leftPressed = true;
}

if (leftPressed){
mc_car.rotation -= carRotation;
}


Thats all for now my next post will be about me conquering collision detection.

Friday 29 January 2010

Flash Game Ideas

So ideas then. In my last post I decided something short and sweet was best for the casual gamer but that I also wanted to attempt to make it addictive. I also have to keep to the brief set so it must include a timer or score system and must be influenced by an outside source. The final thing I had to consider was how far my limited flash knowledge could take me.

I first decided that I would use the time of day as my outside data and that the background would change in my game if it was after and before a certain time of day.

My first idea was to make a maze type game where the user would have to guide a circle through a maze. However I decided against this because i figured it would not be that fun to play over and over and also I thought many of my fellow students would do something similar.

The next idea I came up with was one to do with football because EVERYONE loves football! So I first decided a keep ups game however realised that would become too difficult for me to do and so left that asside for a outside of uni project to work on at a later date. Next I thought penalty shootout however again my limited flash skills canceled this out and thus because another out of uni project that i'd like to do. Also i'm english so penalty shootouts are not my speciality.

My final idea, of which I am now going with, is a car game. I will make a simple track of which a car will go around. I will use a timer so the aim of the game is for the user to get around the track as quick as possible. I thought this would become very addictive as the user would think "oh I can beat that time surely!" and thus play again and again. I also knew that my flash skills could make this work. I will have a hit detection so that the user can't cheat. I would like to add an extra element of randomly spawning blocks so the track is different each time however this will be done last as i'm unsure if I could get that to work. My outside element, as stated before, will be the time of day. After say 6.30pm my track will be darker and have floodlights on, hopefully!

So here goes in making my flash game! (I've actually already started it but I want these blog posts to look like they have been done with at least a few days gap.)

Flash Game Research

Yes there has been a slight issue with blog posts recently but I hope to rectify this over the next few days as i document my flash game making which should've started earlier.

I will start off with my research which was actually just playing flash games, best research i've EVER done. So I set off around the many many flash game websites that exist looking for what type of games were best for the casual gamer types.

My Results and Conclusion: I discovered the best type of game for the casual gamer is one that they can just dip in and out of. Something short and sweet. However because its over so quickly they can become addicted to it and hopefully come back to it over and over again. This is what i hope to achieve with my flash game.

Thursday 21 January 2010

GPS Drawing

GPS drawing is exactly what it says on the tin. It combines GPS technology, art and forms of travelling to create art on a large-scale. Below is an example of GPS Drawing.


This was something done by BMW Motorcycles. It used a GPS Sat-Nav with satellite tracking and google maps to essentially 'draw' over a landscape. The motorbike rider can then 'map out' at drawing by plotting their path on screen and then transfer their co-ordinates then all they need to do is just ride along following the GPS Sat-Nav. Then its just a case of uploading what has been dne.

Tuesday 19 January 2010

Hertzian Space

We discussed hertzian space with Ben with a view to help to develop our project. So what is Hertzian Space? Hertzian space is defined as: a physical space in the electromagnetic spectrum that electronic objects influence and manipulate. Another definition would be an invisible site existing in reality that is accessed through objects and informed by imagination and experience. Below is an imagine I think helps to describe what hertzian space is.


It does link in with mine and Jon's project because bluetooth is definitely an example of Hertzian Space. This is because electronic objects such as mobile phones and bluetooth adapters can access this spectrum.

Friday 15 January 2010

Walking down to Stonehouse with Ben

On Wednesday we were introduced to a past student who graduated from our course. His name was Ben. We walked down to Stonehouse with the intention of searching for bluetooth signals. This however, for me and Jon, was quite frustrating because this was our entire idea from the beginning and now everyone would probably end up doing something similar. We also found out that using phones to find bluetooth signals was not the best idea because the mobile phone's way of searching for signals is not very strong at all. So me and Jon will continue to go ahead with getting a class one adapter and searching for signals ourselves at another time.